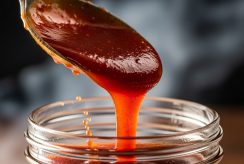
Love that briny, slightly spicy kick of peperoncini peppers on your sandwiches, salads, or straight out of the jar? What if I told you that you could capture that amazing flavor in your own kitchen and enjoy it all year long? Making and canning your own peperoncini peppers is surprisingly simple, incredibly rewarding, and yields a product far superior to anything you’ll find in the store.
Ready to add a little zest to your pantry? Let’s get preserving!
Why Make Your Own Canned Peperoncini?
Beyond the bragging rights of homemade deliciousness, there are several compelling reasons to make your own peperoncini:
- Superior Flavor: Fresh peppers, quality vinegar, and your choice of seasonings combine for a brighter, more nuanced flavor than commercial versions.
- Ingredient Control: Avoid artificial colors, preservatives, or excess sodium often found in store-bought options. You’re in charge of what goes into your jars!
- Cost-Effective: Especially if you grow your own peperoncini or find them in abundance at a farmer’s market, canning them can save you money in the long run.
- Satisfying Project: There’s a deep satisfaction in transforming fresh produce into shelf-stable jars of goodness, ready to enjoy anytime.
What Are Peperoncini Peppers?
Often confused with banana peppers (which they resemble), peperoncini are small, mild, and thin-skinned chili peppers typically harvested when yellowish-green. They have a slightly sweet, tangy flavor with just a hint of heat, making them perfect for pickling. When pickled, they develop that signature briny, tangy taste and a wonderfully tender-crisp texture.
Watch Our Step-by-Step Video!
Canning can seem daunting, but it’s much easier when you see it in action! For a complete visual guide on how to make and can these zesty peperoncini peppers, make sure to watch our detailed YouTube video here:
Our video covers everything from preparing the peppers to safely water bath canning, ensuring your first (or fiftieth!) batch is a success.
How to Enjoy Your Homemade Peperoncini
Now that you have jars of these tangy gems, how will you use them?
- Sandwich Superstar: The quintessential addition to Italian subs, hoagies, and deli sandwiches.
- Salad Sensation: Chop them and toss into green salads, pasta salads, or potato salads for a burst of flavor.
- Pizza Topping: A delicious and unexpected topping for homemade pizzas.
- Antipasto Platter: Serve whole or sliced on an antipasto platter alongside olives, cheeses, and cured meats.
- Marinades: Mince and add to marinades for chicken or pork.
- Snack Attack: Enjoy them straight from the jar as a zesty, low-calorie snack!
Conclusion
Making and canning your own peperoncini peppers is a fantastic way to capture that beloved tangy flavor and enjoy it year-round. It’s a fun, rewarding project that adds a unique touch to your pantry and your plate. So grab some fresh peppers, gather your canning supplies, and get ready to create some zesty magic!
Happy canning!
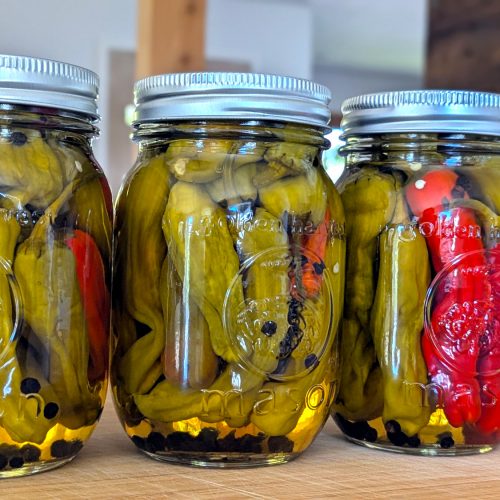
Pickled Peperoncini
Ingredients
- 1 lbs of peperoncini or banana peppers works with any small pepper, they just taste different
- 2 cups distilled vinegar with 5% acidity
- 2 cups water
- 2 tbs salt
- 3-4 tbs sugar
- 2 tsp black peppercorns
- 2 bay leaves
Instructions
- ➡️ thoroughly wash the peppers. Using a sharp knife cut a slit down the side of every pepper. This will allow the brine to get in there.
- ➡️ In a small pot bring water to a boil and add your canning lids. Turn off after a minute and leave the lids in the hot water until use.
- ➡️ Combine the remaining ingredients in a pot and bring to a boil, reduce to a simmer and keep it there ready for use
- ➡️ Remove the bay leaves
- ➡️ Tightly pack the peppers into your jars. Make sure there’s no stems near the rim. If there are, simply use scissors to remove them. You don’t want anything impeding your seal.
- ➡️ Fill the jars with the simmering brine until they overflow.
- ➡️ Remove any seeds that float up and might get on the seal.
- ➡️ Using a magnetic lid tool get a lid and a band and seal the jars
- ➡️ If using within 3 months, they can be stored in the fridge after cooling down
- ➡️ For shelf stable long term storage outside the fridge, process the jars in a water bath for 10 minutes
You may also like this
Ciabatta Bread Recipe (Easy Homemade Italian Slipper Bread)
9000 Years Later: Focaccia Genovese Made Easy (High Hydration Method)

German Leberkäse Meets Pizza: The Ultimate Fusion Recipe
German Meatloaf with Lentils & Apple BBQ Glaze — Frugal, Juicy & Delicious